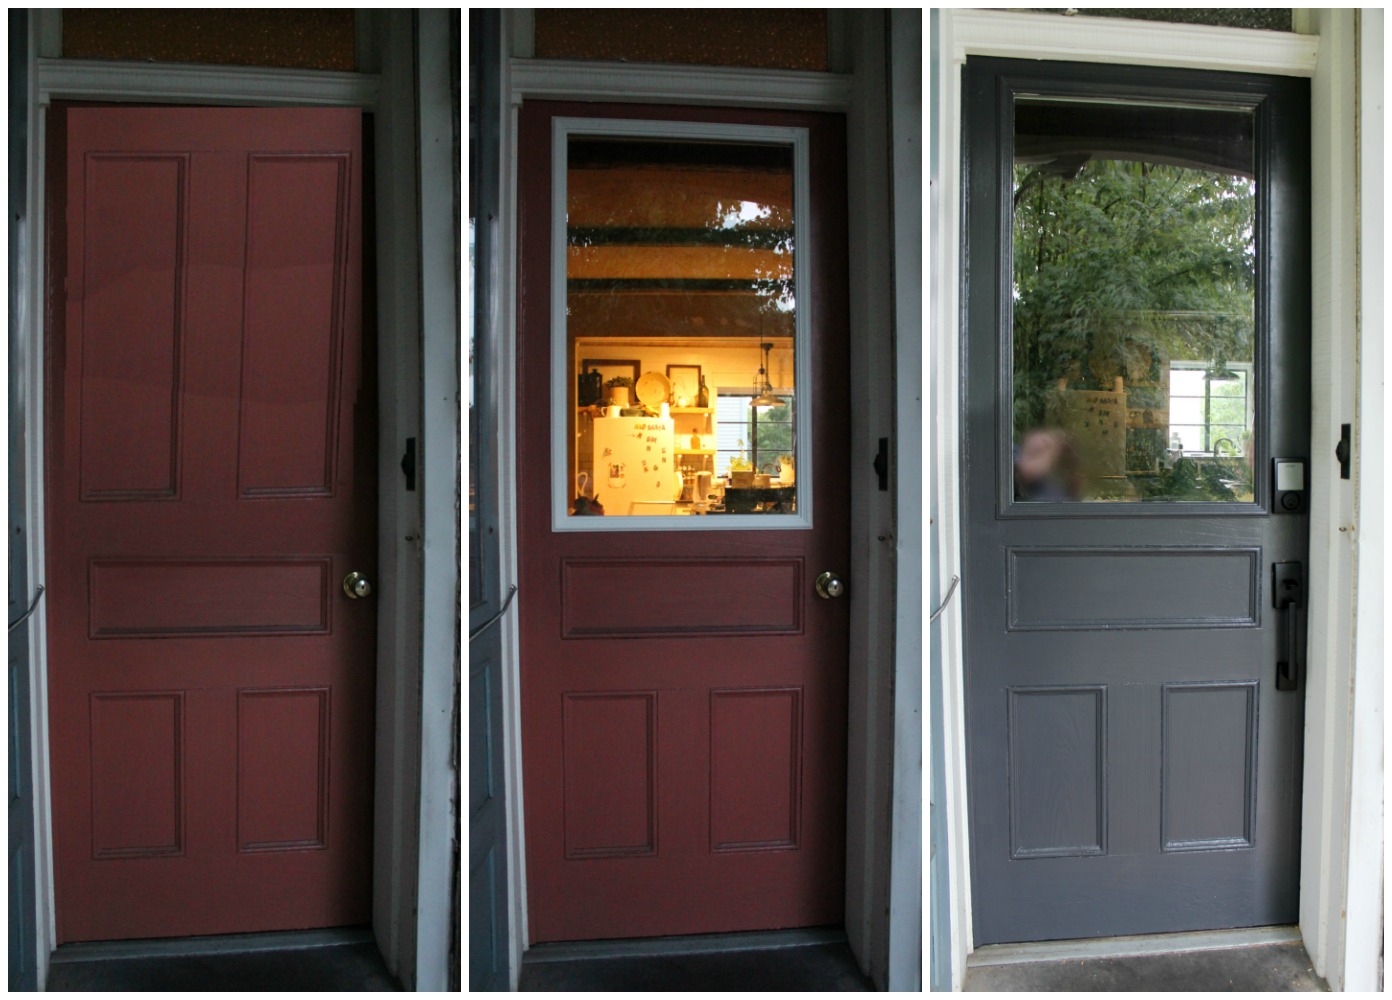
When we moved into our fixer upper, we were blessed with many dated things to deal with – and one of those things were 4 faded maroon exterior doors. Yes, you should be jealous.
We’ve slowly been updating all of our exterior doors (just one left!). I wanted to share an easy tutorial for how to update your door in one weekend, along with some fun ideas/tips I’ve learned too.

If you’re painting a typical 6-panel door, there is definitely a formula you should follow. Here’s a video I made to show how I did it:
And here’s a graphic I made so you can have it handy when you need to update your door (pin it here!)

Here’s the materials you’ll need to update your door in one weekend
(affiliate links are included – which means I get a small percentage of any purchases you may make at NO extra cost to you. Thank you for supporting my family and business!)

- A great primer (this one is my favorite)
- Door color of choice
- I used Benjamin Moore “Wrought Iron” in semigloss
- Sandpaper
- Paintbrushes (my favorite ones hands down)
- Small trim roller
- New hardware (love the new hardware we got!)
- Polycrylic
Let’s get going:
- Clean your door. Get in all of the little corners too – use an old toothbrush if needed.
- Lightly sand your door. You just want to “scuff” it up, you shouldn’t actually be pulling up much paint with this sanding.
- Apply 1 good thorough coat of primer. Follow the same order for painting your doors as highlighted in the above graphic.
- Allow the primer to dry per instructions. Every primer is different – many of them let you paint on top in less than an hour.
- Apply 2-3 coats of your paint of choice. Keep in mind – especially if you choose a dark color – the first coat will look pretty bad! Determine after the second coat if you’re satisfied or if you need to do a third coat.
- Apply 1 coat of polycrylic. You could also use polyurethane, but that has a tendency to yellow over time.
- Install new hardware. Save some money and do this yourself, or have someone install it for you if you’re not comfortable with that.
I wrote ALL about the hardware we chose and why we love it in this post – let’s just say I’m SO glad I’ll never get locked out again!

Another fun fact: our door didn’t originally have glass in it! We were actually looking at replacing this door originally, but I didn’t love my options (or the price tag that comes with it – yikes!) I wanted something with glass because this corner of our kitchen was super dark. I have to credit this idea to our favorite handyman Tim. He told us he could take the door to a local glass place and have them put in a piece of glass for a fraction of the cost of a new door. We paid $275 for the glass to be put in, and we couldn’t be happier with it! Moral of the story: think outside of the box and see if you can use what you already have. You may end up liking it more than if you would have bought something new!
Please excuse the poorly photo shopped image, but I didn’t get a picture of the door before we got the glass in it. I love the transformation!
And in just one weekend – you can have a “new” door! It’ll make such a difference for your curb appeal, and you can feel proud to welcome guests to your home!
Have you painted any exterior doors in your home? I’d love to hear what color you chose!

Love your ideas and decorating! We are moving into a ‘new/old’ house and can’t wait to start fixing it up!
Thank you Pamela!! It’s a wild ride – a true adventure!! I wish you the best of luck with your “new” home 🙂