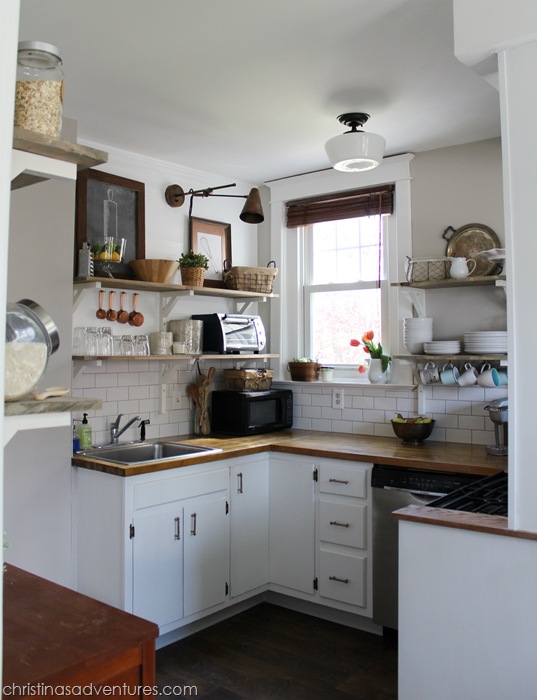
I was so nervous/excited to *finally* share our finished kitchen with all of you – thank you so much for all of your encouragement & support! It means the world to me! Make sure you scroll all of the way to the bottom to see how much our DIY kitchen remodel cost:
Updated to add: This was our first kitchen remodel, but we did it AGAIN a year later in our “forever home” (a 1902 Victorian fixer upper)! Come see how we designed our new kitchen – you won’t believe the transformation!

A few important things about this kitchen:
- We paid for all of it out of pocket. This is one of the reasons why it took us 6 months to complete- we did projects as we had money to do them. I’m a SAHM & my husband works at a seminary, so we definitely don’t have a lot of extra funds.
- We don’t have any formal training, but we did everything ourselves except for the flooring & minor electrical work.
- This took a lot of time. We worked on it most weekends for 5 months. We started the project when our baby was 4 months old. (yes, we’re crazy)
- We really wouldn’t have been able to do it without our families. They helped with many weekend projects – and helped watch our little guy while we worked in the next room!
- This kitchen is far from perfect. Like any DIY project, there are “flaws” wherever you look. But we’re so happy with how much money we were able to save while still ending up with a beautiful kitchen!
I’ve compiled some affiliate links for budget-friendly ways to shop my kitchen:
Here’s a breakdown of the big pieces of the room:
Cabinets
-
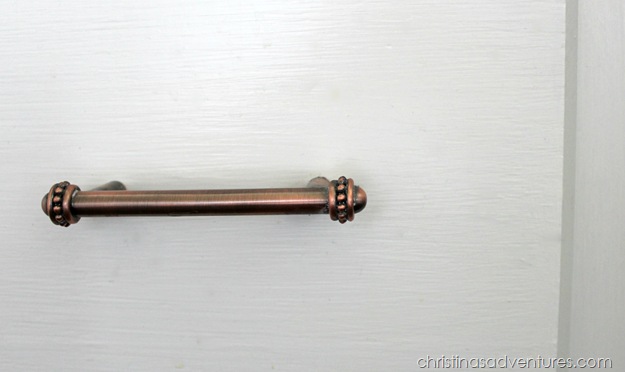
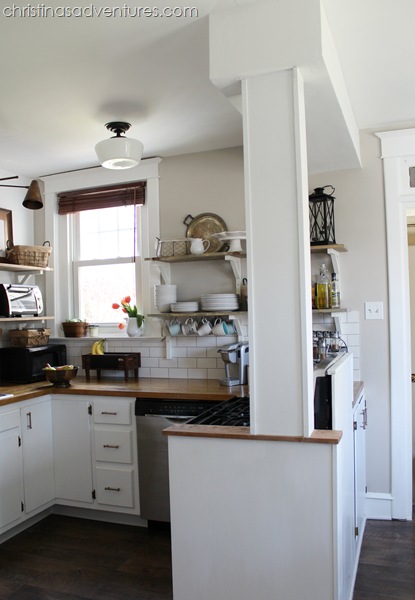
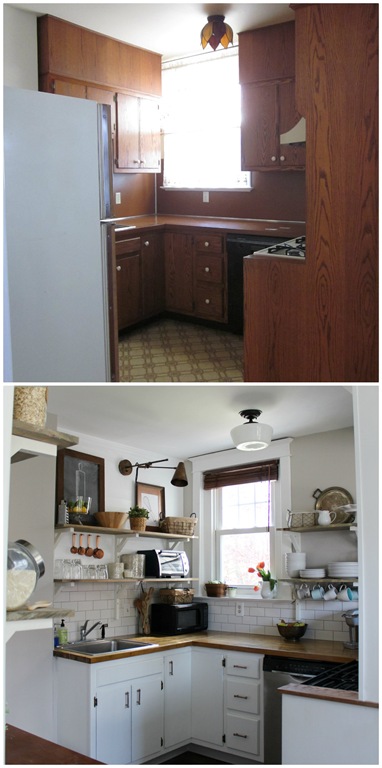
We ripped out the upper cabinets to open up the space, but kept the lower cabinets in. We sanded, primed, painted (3 coats), and polyurethaned them. The hardware is from Lowe’s.
Open Shelving
-
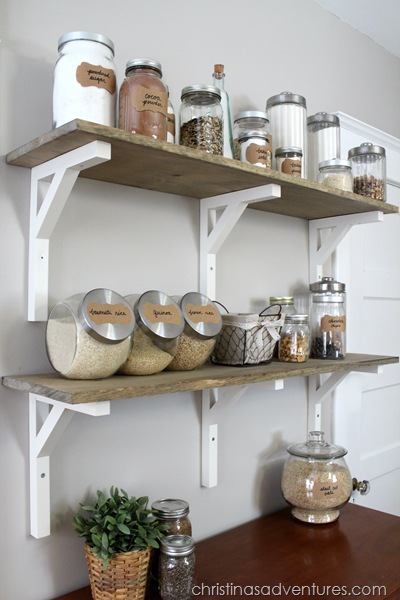
I won’t repost all of the details like I did in this post about our open shelving pantry, but here’s the short version.
-
For the entire kitchen:
-
6 pine boards (cut down at our local hardware store)
-
3 brackets for each board – best price found at IKEA for $6 a bracket
-
-
Stained with Minwax weathered oak (my ultimate FAVORITE stain color!) & sealed with finishing wax
-
The Floors
CHECK OUT WAY MORE DETAILS ABOUT OUR FLOORING CHOICE IN THIS POST
-
The most expensive part of our kitchen remodel was our flooring. We originally planned on ripping up the vinyl & carpet that was in the kitchen when we moved in, and then hiring someone to refinish the existing wood floors that were under the vinyl. BUT after a lot of headache, it was determined that the floors weren’t in good enough condition to refinish, and we needed to move to plan B.
-
We picked out Luxury Vinyl Tile (LVT) after we spent time at the flooring store and they told us that it was a more durable choice (and the same price point) as laminate flooring. We used “Adura Dockside” and I cannot tell you how much I am in LOVE with it.
-
These floors are super durable, look amazing, and will last a very very long time.
The Appliances
-
We actually hadn’t planned on getting new appliances for the kitchen when we started the renovation. Although the appliances were very old when we bought the house, we were going to wait until they fizzled out to replace them.
-
The dishwasher died a few weeks before we started the renovation. Figures. We lived without a dishwasher for a few months, and then my parents graciously gifted us with a dishwasher for Christmas!
-
Around the same time, our flooring was getting done. The flooring people (not from Roy Lomas) damaged our range, and we decided to take advantage of after-Christmas sales to get a new range.
The Refrigerator
-
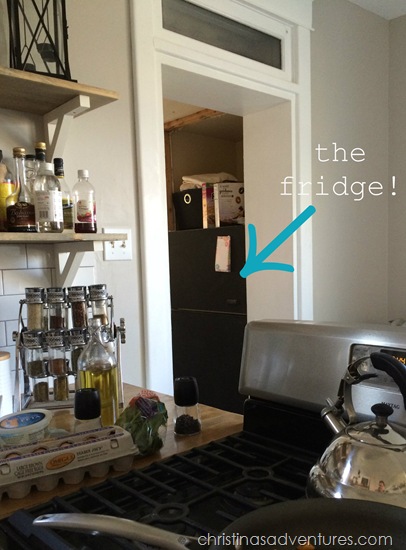
Did you notice in the pictures that there is no refrigerator?? We didn’t get rid of it, I promise. It’s actually down a step to the left of our kitchen.
-
When we moved to the house, we made the coat closet into a pantry. When we moved our pantry into our kitchen, we moved the refrigerator into the coat closet (we knocked out some of the wall to make it fit).
-
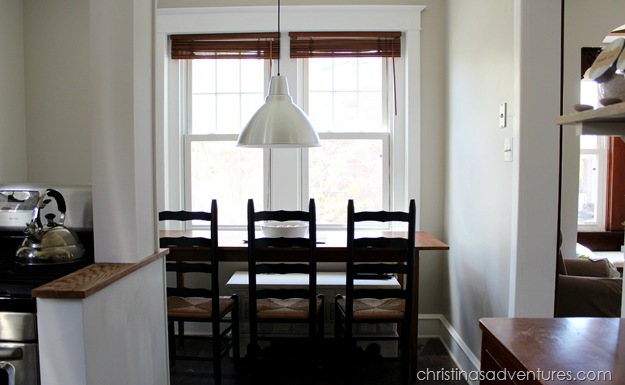
It actually works out really well – it’s not far…here’s a picture of what I see when I’m cooking at the range:
-
What really makes this arrangement work is that area of countertop next to the range – it’s our place to put things that need to go back in the fridge, or just got taken out of the fridge. It just works!
-
Of course – after moving the beast, she’s dying on us. Stay tuned for a new refrigerator …
The Countertops
-
We were planning on buying butcher block from IKEA – and then my parents realized that they were doing a kitchen remodel of their own at their lake cabin, and they were going to be throwing away their butcher block! Craziness!
-
We snatched their old butcher block (which had the same sized sink hole & everything) and cut it to fit our counters. We stained it with Minwax Weathered Oak & sealed it with Waterlox.
The Pipes
-
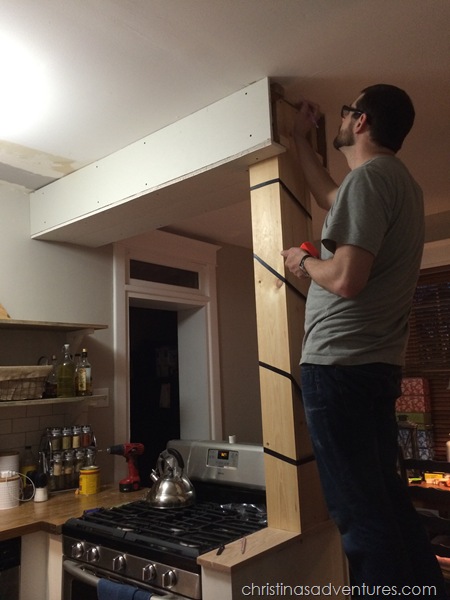
When we knocked down the upper cabinets, we found lots of piping underneath. No fun. We played around with the idea of leaving them exposed, but decided that for safety reasons we were going to cover them back up.
-
We got a quote from our handyman for $1000 to build a soffit & a column – yikes! We definitely didn’t have that money to spend. SO, we researched how to build a soffit online, found a good resource, and went from there!
-
The actual soffit is framed with 2×4’s, and then drywalled. The column itself is made of solid wood.
I think it turned out pretty darn good – especially since we had no idea what we were doing going into the project!
Ok – so I think that about covers it for the big items in the kitchen. Here’s our source list for everything in the kitchen:
I loved sharing this journey on my Instagram & Facebook!
Shop this kitchen with these links:
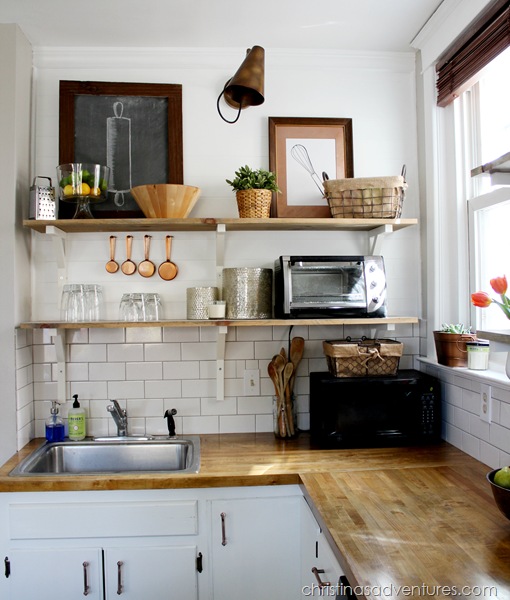
TOP SHELF
-
Grater: thrifted
-
Trifle bowl: yard sale
-
Wooden bowl: IKEA (similar one here)
-
Frame: thrifted & painted with chalkboard paint
-
Lighting fixture: Restoration Hardware Outlet (such great deals!) (similar ones here)
-
Fake plant & planter: IKEA
-
Lined Basket: Kohl’s (similar ones here)
-
Frame: thrifted & mat spray-painted – whisk drew on with a sharpie
BOTTOM SHELF:
-
Glasses: Amazon
-
Measuring cups: Target clearance – FINALLY found another set online!
-
Hurricane vases: West Elm
-
Toaster: Amazon
ALSO PICTURED:
-
Soap dispenser: IKEA
-
Handsoap: Grove Collaborative – awesome deals!
-
Existing sink was put into the new countertop
-
Wooden spoons: various sources – stored in a mason jar
-
Basket: Ross
-
Microwave: hand-me-down from my brother’s grad school dorm room. Gross? Eh. I say resourceful

-
Copper planter: gifted with bulbs a few years ago
-
Wooden Blinds: IKEA
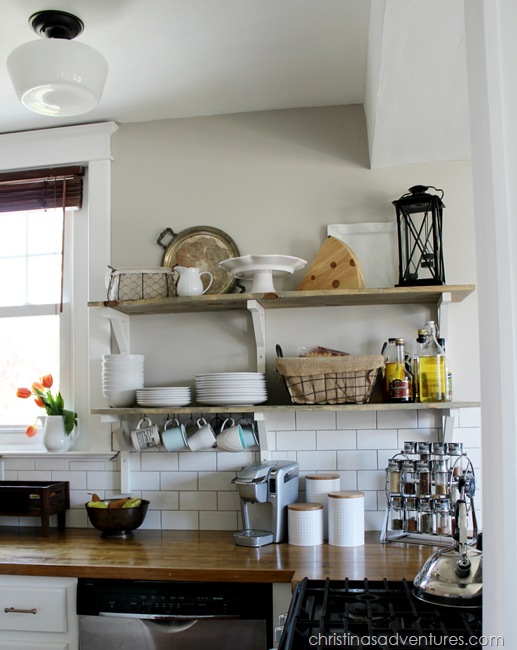
TOP SHELF:
-
Basket: Zulily (LOVE finding deals on this site)
-
Creamer container: Ross (similar here)
-
Silver dish: thrifted
-
Cake Stand: Ross (similar here)
-
Cheese serving set: gift from my husband years ago
-
White plate: Ross
-
Lantern: Hobby Lobby (similar here)
BOTTOM SHELF:
-
Dishes: IKEA
-
I need to tell you that I LOVE the simplicity of these dishes – and the fact that they are so inexpensive! They’ve held up great while we’ve used them for over a year so far!
-
-
Bread Basket: Kohl’s
-
Olive Oil glass container: IKEA
ALSO PICTURED:
-
Serving pitcher with flowers: yard sale
-
Wooden fruit bin: Ross
-
Copper fruit bowl: thrifted
-
Mugs: IKEA, Ross, West Elm & from a favorite vacation coffee shop
-
White trio of storage containers: Target (a few years ago on clearance – I like these even better)
-
Spice Rack: online yard sale (I added washi tape labels)
-
Lighting fixture: Home Depot (very similar ones here)
-
Table: Free from my parent’s basement (originally made in Lancaster)
-
Chairs: Free from my in-law’s neighbor who was getting rid of things before she moved
-
Blinds: IKEA
-
Light Fixture: IKEA
-
Bench/chest: Free (full post on how I refinished it here)
-
For all the details about our open shelving pantry – please read this comprehensive post
COST BREAKDOWN & GRAND TOTAL
OK – I totaled up the cost of the entire renovation for your curiosity as well as mine.
-
Flooring (total for materials & installation): $1,318
-
Electrical work: $160
-
Appliances: $580
-
Lighting Fixtures: $133.95
-
Hardware: $39.76
-
Blinds: $80.97
-
Brackets: $108
-
Décor/storage: $141.11
-
Butcher block: free
-
Kitchen table/chairs: free
-
Paint/lumber/tools/construction supplies: $833.49
The GRAND TOTAL for the ENTIRE KITCHEN: $3,395.28
I don’t want to brag, but I think I might for just a minute. This took 6 months of work. It was a LOT of work. But for spending under $3500 on the entire space, I think it is pretty amazing – and so worth it.
THANK YOU for being a part of this makeover, especially my Instagram friends, who put up with my updates for months! It has been so much fun sharing all of this with you!
This post contains affiliate links, but only for products I have used and have loved. Full disclosure here.


You guys should be beyond thrilled with yourselves!! I know exactly how much time and work goes into even small kitchen renos and yours turned out beautifully! Plus doing it with a baby? Extra points! I absolutely adore the shelving and how you styled it. Enjoy that beautiful kitchen!
Christina this is just so awesome! I had to show it to my hubby and he was impressed too! He was very impressed that you did the sofit yourself instead of paying that kind of money to hire it done! I wonder if we could completely redo my kitchen for that price tag – hmmmm. I’m tempted to give it a go!
You have a right to brag, that’s awesome! The room is TOTALLY different and for such a good price!!
If this kitchen ‘cooks’ half as good as it looks, you’ve got a winner. It is so charming.
Looks amazing! Great job! Just curious what was the cost of your subway tile? I didn’t see it in your breakdown costs? Thanks!
Ahh good question!! It’s actually wrapped into the ‘construction supplies’ bullet- I just totaled up all of our hardware store receipts and it got lumped into there. I think the tile, grout & adhesive was right around $75
Did you mention the color and brand of grout? The kitchen is awesome!
Yes would love to know the color and brand of the grout!
I’m beyond impressed! You brought so much light and life into your kitchen.
Thank you SO much!! That was the goal
Wow! I am in love with your kitchen… everything about it! The open shelves, the tiled back splash and planked wall, the butcher block counters, everything! And my very favorite part is that it’s so small, I LOVE small kitchens! I am currently on the hunt for a fixer upper house and so it’s very inspiring to see that you were able to do most of the work yourself for such a great price!
Tania
Hey, I love your kitchen so much! It’s stunning!
Please could I ask a question – what size are your metro tiles on the wall? We are trying to choose between a 15 x 7.5xm and a 20 x 10 cm tile and not sure which to go for. Yours are perfect!
Definitely one of the nicest kitchens I’ve seen on apartment therapy. Congrats. I think your taste in decorating is what makes it special.
I love this kitchen! It is gorgeous. I have a small-ish kitchen too, and I think bringing as much light in as possible is the way to go. I painted all of our cabinets a light mint green color. It made the space feel so much bigger. I adore the open shelving in the space.
It’s hard to believe it’s the same place. You worked a miracle. It’s inspiring to me. I have been on a mission to change our kitchen space for over 20 years. You are proof that with a lot of elbow grease and planning it can be done. It looks awesome, Enjoy!!!
Visiting from SITS
This is adorable! Your budget is impressive, thanks for such a comprehensive cost and supply list. Love the before and after pictures too. Your patience and hard work has paid off! Glad to find you at the SITS linky.
LOVE it! It has a rustic look with a sleek touch. I’m so glad to see how honest you were about how long it took – HGTV can really give people some unrealistic expectations. Awesome job Christina! Stopping by from SITS!
Wow – this is by far the best bang for the buck kitchen I’ve seen. It’s beautiful (and your shelf styling is amazing BTW)! Enjoy it!!
OH I LOVE LOVE LOVE what you did! I have a small kitchen and a similar situation with some pipes. The previous owners ran a pipe for electrcal wires and then covered it with wooden print contact paper and then added two space racks stacked on top of each other. Fine and all except they are right next to the exhaust fan for the oven so they are always getting steamed…gross. So I have never used it and in the year we have lived here I have wanted to do something to this kitchen and you have so inspired me!!! I had to call hubby at work and tell him what I had found. He was actually open to the idea of looking at your blog to see what we can do! So thanks for sharing!!! Here’s hoping ours turns out as lovely as yours!!
Thank you for linking up to our “Outside the Box” link party! The kitchen looks amazing! I love the white subway tiles, the open shelves, all the light that it’s there now! Congrats on the job well done!
Megan
I love your kitchen. I live in a cookie cutter condo and I am looking for ways to add some architectural detail. Thanks for including all of your supplies. It is really helpful. What paint did you use and which colors?
Great job! I didn’t see the paint color mentioned and I am desperately searching for a similar color, would you mind sharing the name?
The color is Martha Stewart’s “Sharkey Gray” – it’s one of my FAVORITES!! 🙂
This is amazing! It turned out SO well- beautiful! Thank you for taking the time to give all the resources too!
Thanks so much, Jane! 🙂
I too was wondering what paint color you used in the remodel? I love it!
The color is Martha Stewart’s “Sharkey Gray” – it’s one of my FAVORITES!! 🙂
Hi! I love your kitchen! I’m currently redoing the flooring in my house and have been looking at the Adura Dockside. I was just wondering which colour you have in your kitchen? The dockside – pier or the dockside -boardwalk? Thanks in advance! 🙂
wow that flooring looks great
We just replaced our floor in the bathroom last weekend with adura dockside in seashell . It was so easy to install and we love it! Your kitchen is beautiful 🙂
I found your kitchen redo on pinterest a while back and fell in love. then we bought our house and I have been dreaming of a small scale remodel (switch from a U shape to an L shape) and just LOVE the feel and look of yours! If you see this, how do you like the open shelves as opposed to closed cabinets? Do things get dusty? 😉
Thanks so much, Sarah! We actually moved out of that house in April, but we designed our next kitchen with open shelving as well!! We really love it – especially in a small kitchen. It adds so much character and style to a space! I don’t miss upper cabinets at ALL. And no – things got just about as dusty as they would in the rest of the kitchen, but the dishes we used there were used so regularly, so they didn’t gather dust easily 🙂 Best of luck with your kitchen!
Thank you so much for taking your valuable time to detail your work! My husband and I are considering buying a home with a small kitchen that does not have anything but some cabinets and a sink. Your ideas are so helpful and the resource list is amazing!
Thanks so so much for this comment! It means a lot to me – I love knowing that it’s valuable information for other people! 🙂 I find a lot of inspiration from other bloggers when we do our house projects, so I hope to do the same for other people 🙂 Best of luck with your kitchen renovation!
Hey just want to Noe how u clean wood counter so it doesn’t smell and stays shine
Amazing job! Hard work pays off!!!