
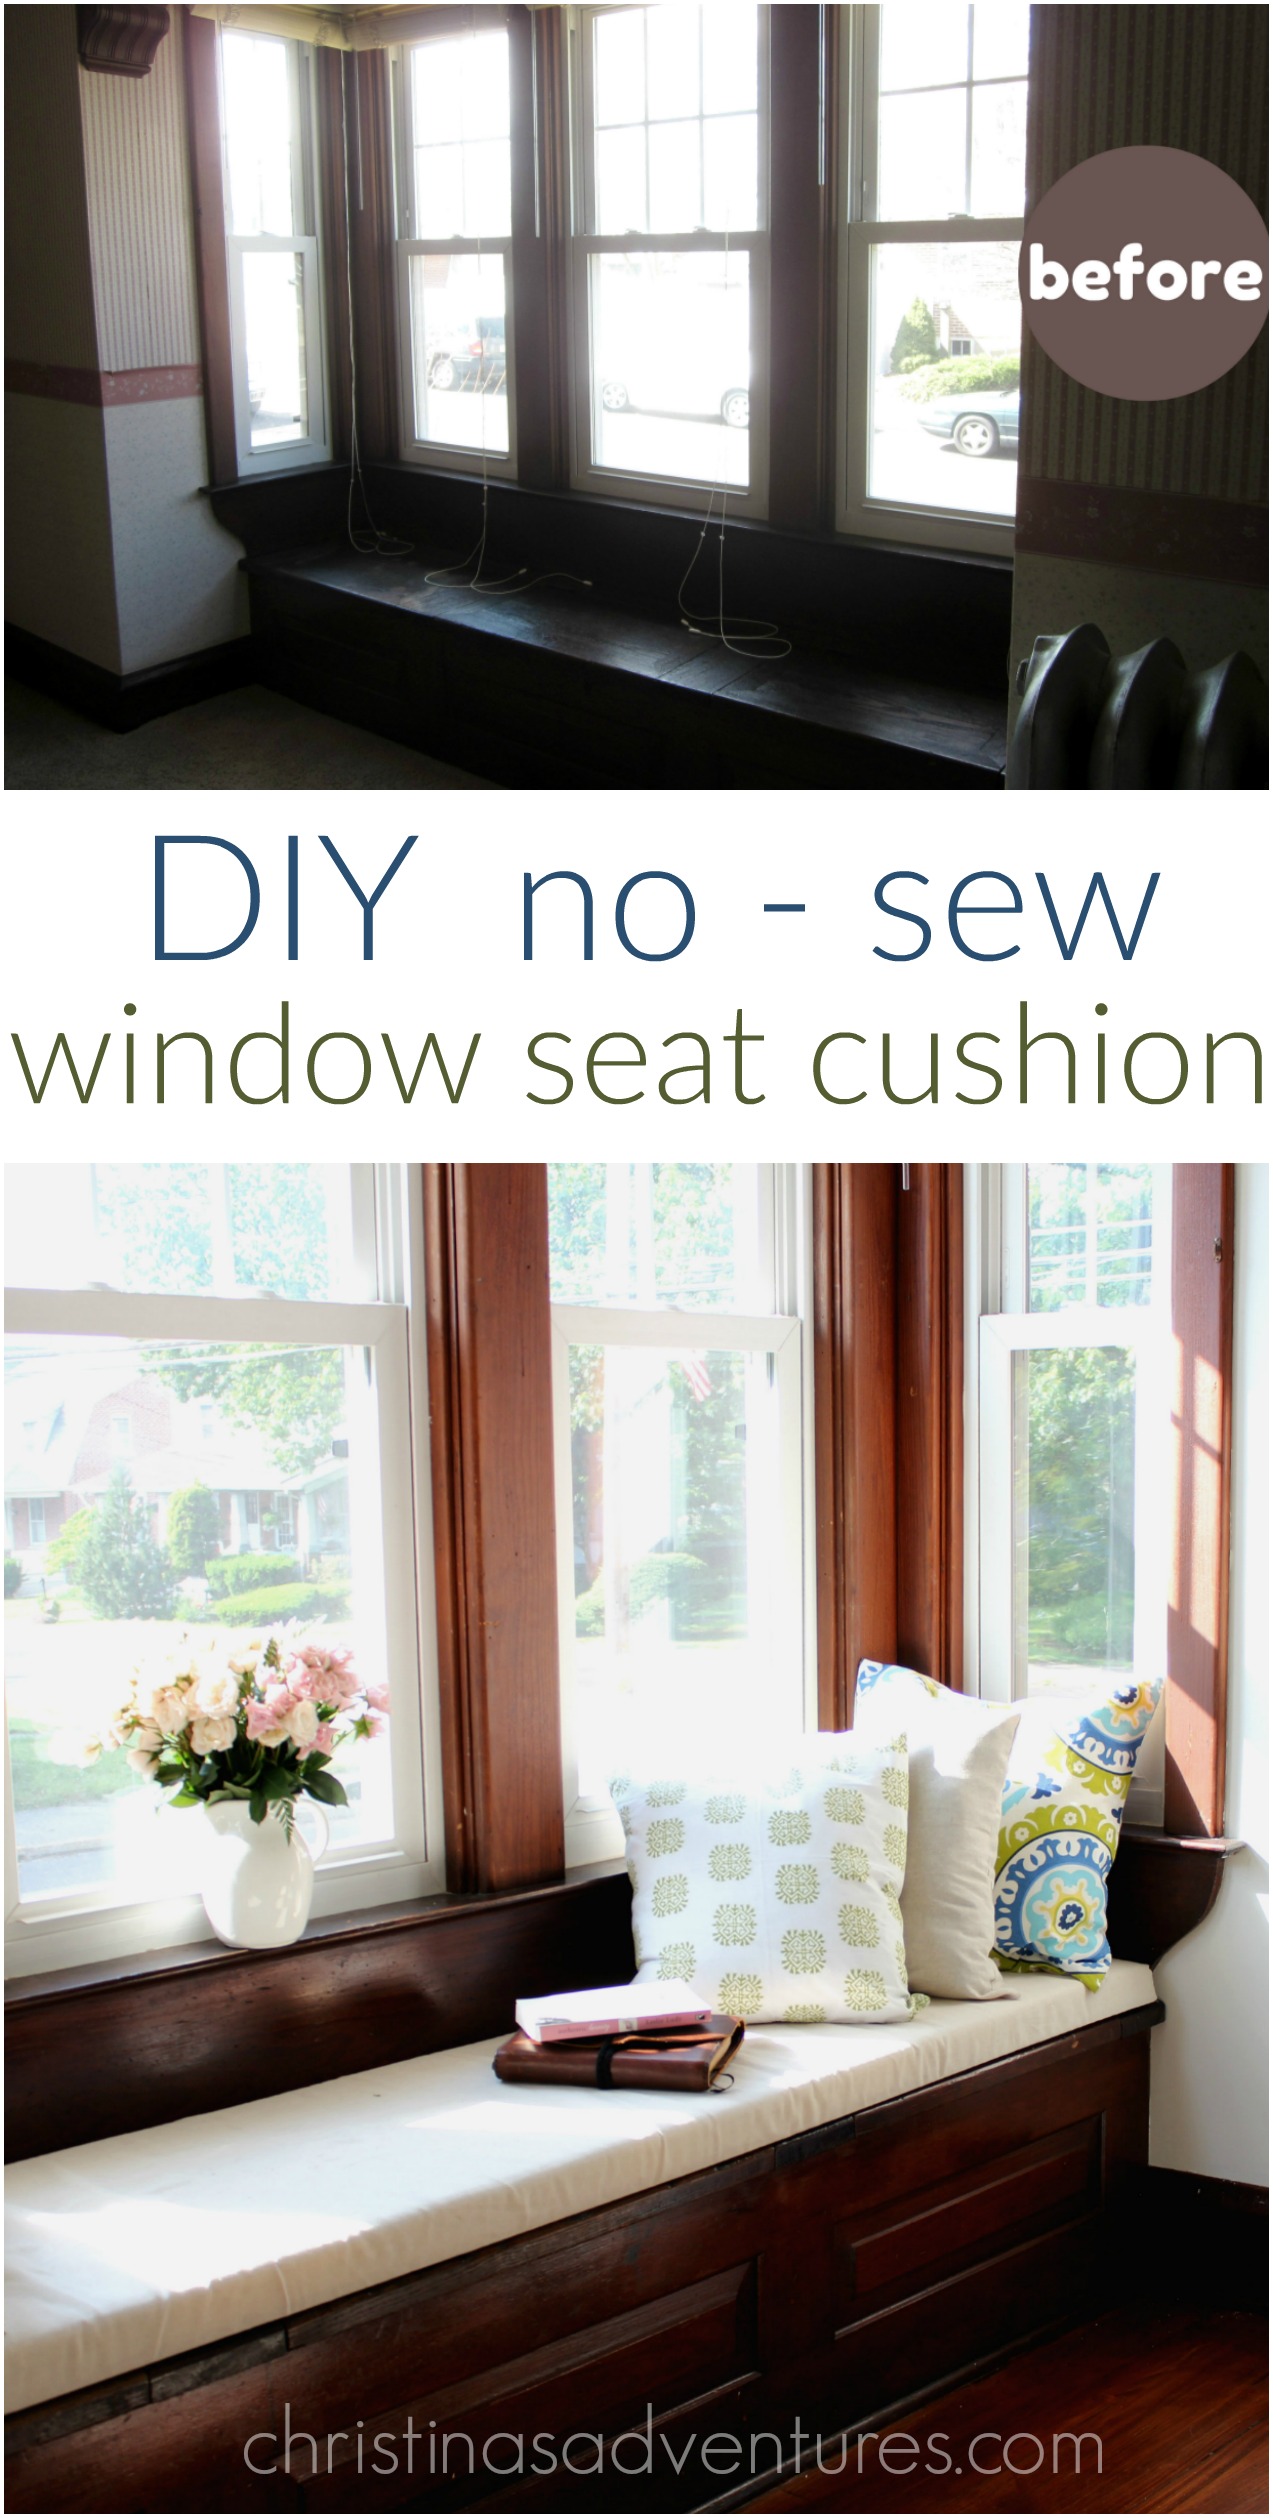
Easy DIY window seat cushion tutorial:
Ahh I am in LOVE! I’m so glad we got this project done before the baby arrives, because I can definitely imagine that we’ll have many snuggle sessions on this new comfy window seat! And since my energy is dwindling these days, it was perfect that this project was really simple! It requires NO sewing or expensive equipment!
What you’ll need for this project:
- Fabric of choice (I used a canvas dropcloth)
- Foam
- Plywood
- Staple gun (my favorite one – it’s also cheap!)
I got some plywood cut at the hardware store (ours happened to be 18 inches deep and 8 feet long).

I ordered some foam from JoAnn Fabrics online. Let me tell you – foam is *expensive*. I originally went into the store for some foam, but they were out of the thickness I wanted to use (which was 2 inches thick). It ended up being a good thing, because the next day I saw that they had a sale for 50% off of all of their foam online. I love a sale!
I also decided to skip on pricey fabric for the window seat, and I used a canvas drop cloth instead. I love how durable the fabric is, and the neutral color works perfectly in this space!
I laid the drop cloth on the floor, cut the foam to the size of the plywood, and laid both on top of the cloth (so you’ll have the “underside” facing up).

I had my husband help me with the next part – it just helps to have a second pair of hands. He pulled the fabric tight on the plywood, and I used a staple gun (this is the one I use and love – it’s super inexpensive!)
I stapled the fabric right to the back of the plywood. We did this with one layer, and then overlapped the other side of the fabric on top of that and stapled again.

Then comes the trickiest part – the corners. It’s really not hard, but it takes a few minutes to make sure you get the look you want. I folded the corners like I would on a present. I had my husband pull the ends tight once I folded them, and we stapled them again:

That’s it- we just flipped it up onto the window seat! I made some pillows for the space, and I love how it adds the perfect touch of color!
Thrifty tip- use fabric remnants that you love, and then use a neutral fabric on the back of the pillow. It cuts the cost in half!

Let me tell you – looking at these pictures makes me fall in LOVE with our wood molding all over again. SO glad we’re not painting it – the space just wouldn’t look the same without that dark wood!

Of course this gives Buckley the perfect look-out spot for the pesky rabbits in our yard! He was too scared of the slippery bare wood before, so he just LOVES “his” new perch!

Let’s just take a trip down memory lane and take a peek at what the window seat looked like a few months ago (complete with lovely wallpaper and wall to wall carpet):

I am officially in love with the transformation! And for less than $50, I think this is the perfect way to add some color and modernization into our old home. Slowly but surely we’re going to make it fit our style!

We’ve since moved, and I’m so thankful our “new” (fixer upper house) has a window seat too! See our fixer upper journey here!
If you found this DIY window seat cushion tutorial helpful, please pin it here to share with others & save for later:
Like this post? You’ll also like:
- Our first home: all of the before & afters
- Decorating with wood trim
- Our Craftsman family room transformation

The after is amazing! I am so impressed with you! haha 🙂
Love it! I would love to make a cushion for my window seat as well but it isn’t a perfect rectangle so I’ve been hesitant to try to sew one. This seems so much easier! And you’re right… the dark woodwork is goooorgeous!
This is so beautiful! I’d love to have a window seat in our future home. I really love how the lighter fabrics brighten up that space and really make the beautiful dark wood pop!
The transformation is AMAZING! The throw pillows are awesome too. I am pinning this tutorial. We plan to build a window seat in our new dining room – we are remodeling – so this will come in handy! Thank you!
Beautiful! What a lovely spot.
what a wonderful, sunny spot! enjoy!
Great tutorial…this turned out so cute! Come link up to centerpiece Wednesday linky party on my blog and share this post with us. http://thestylesisters.blogspot.com/2013/06/dr-suess-party-and-centerpiece-wednesday.html
Love this little space! So homey and cute!
Loved the way of transmitting the look of a window in such a simple but beautiful style. Further you can also add window shutters to make your place look more stylish.
it is a beautiful transformation! 🙂 so pretty! 🙂 love that it only costs less than $50 too! & your dog Buckley looks adorable there! 🙂
Ingrid
looks so great! and I love those pillows.
Your window seat looks so nice now. What a lovely transformation! My dog loves to sit at the window too and look out for the squirrels in our yard. 🙂
This is really great and so timely for me! I have a friend making a window seat for my daughter and I was just starting to think about how I was going to make the seat top. Thanks!
I love your window seat! Perfect place to sit and drink coffee or to read a book. Great makeover!
Very pretty, and it looks like a fairly simple project. Thanks for sharing the tutorial.
This space is so inviting, makes me want to curl up and read a book. I love the way it turned out.
What a beautiful space…loooove the dark wood too. And I think your no-sew cushion is awesome! I’m including a link back in this week’s highlights. Thanks for sharing, Christina!
I had a window seat in my room in one of the homes I lived in growing up, and there’s something very appealing to me about them. Yours is really nice…the wood and the cushion. A good place to sit and read.
That looks like a nice cozy place to read a good book! I love window seats and window seat cushions. Yes, foam can be very expensive! Good job.
How much fabric did you use? It looks great!
Cute! I really need to make a cushion for our window seat — I am just using a big pillow now. (Which my kids only think is “OK”.) I have a question: What kind of tool did you use to cut the foam? Good tip about buying the foam online — I’ll have to try that! Thanks for the tutorial.
Looks lovely – completely lightens the space.
I would love for you to link up at the Empty Your Archive party – we’re focused on decorating tutorials & tips this week, Alice @ Mums Make Lists
http://mumsmakelists.blogspot.co.uk/2013/07/empty-your-archive-14.html
so so pretty and what great pix too! Thanks so much for linking up to support Habitat – hope to see you back tomorrow. (will also be sharing on FB later today)
How do you clean the fabric? I love this approach, my only thought is a slipcover is potentially better (although significantly more expensive) since it can be removed and washed.
I love this and need this in my living room. Of course, it REALLY helps that this fits my craft skill and budget. Question though: what is the thickness of plywood, that you would recommend for this? I tried going to the Home Depot website and found all these different thickness-es, so not sure which one to use.
Thank you sooo much for posting this 🙂
Hi, love this! I’m getting ready to do the same thing for the one in our kitchen and had a question for you. Ours is 7′-6″ long and I was anticipating having to use two pieces of foam, was yours just one continuous piece for that length? I realize this is an older post so hopefully you still see this :). Thanks!
These are great ideas. I’m about to start making window seat cushions and this is a wonderful inspiration.