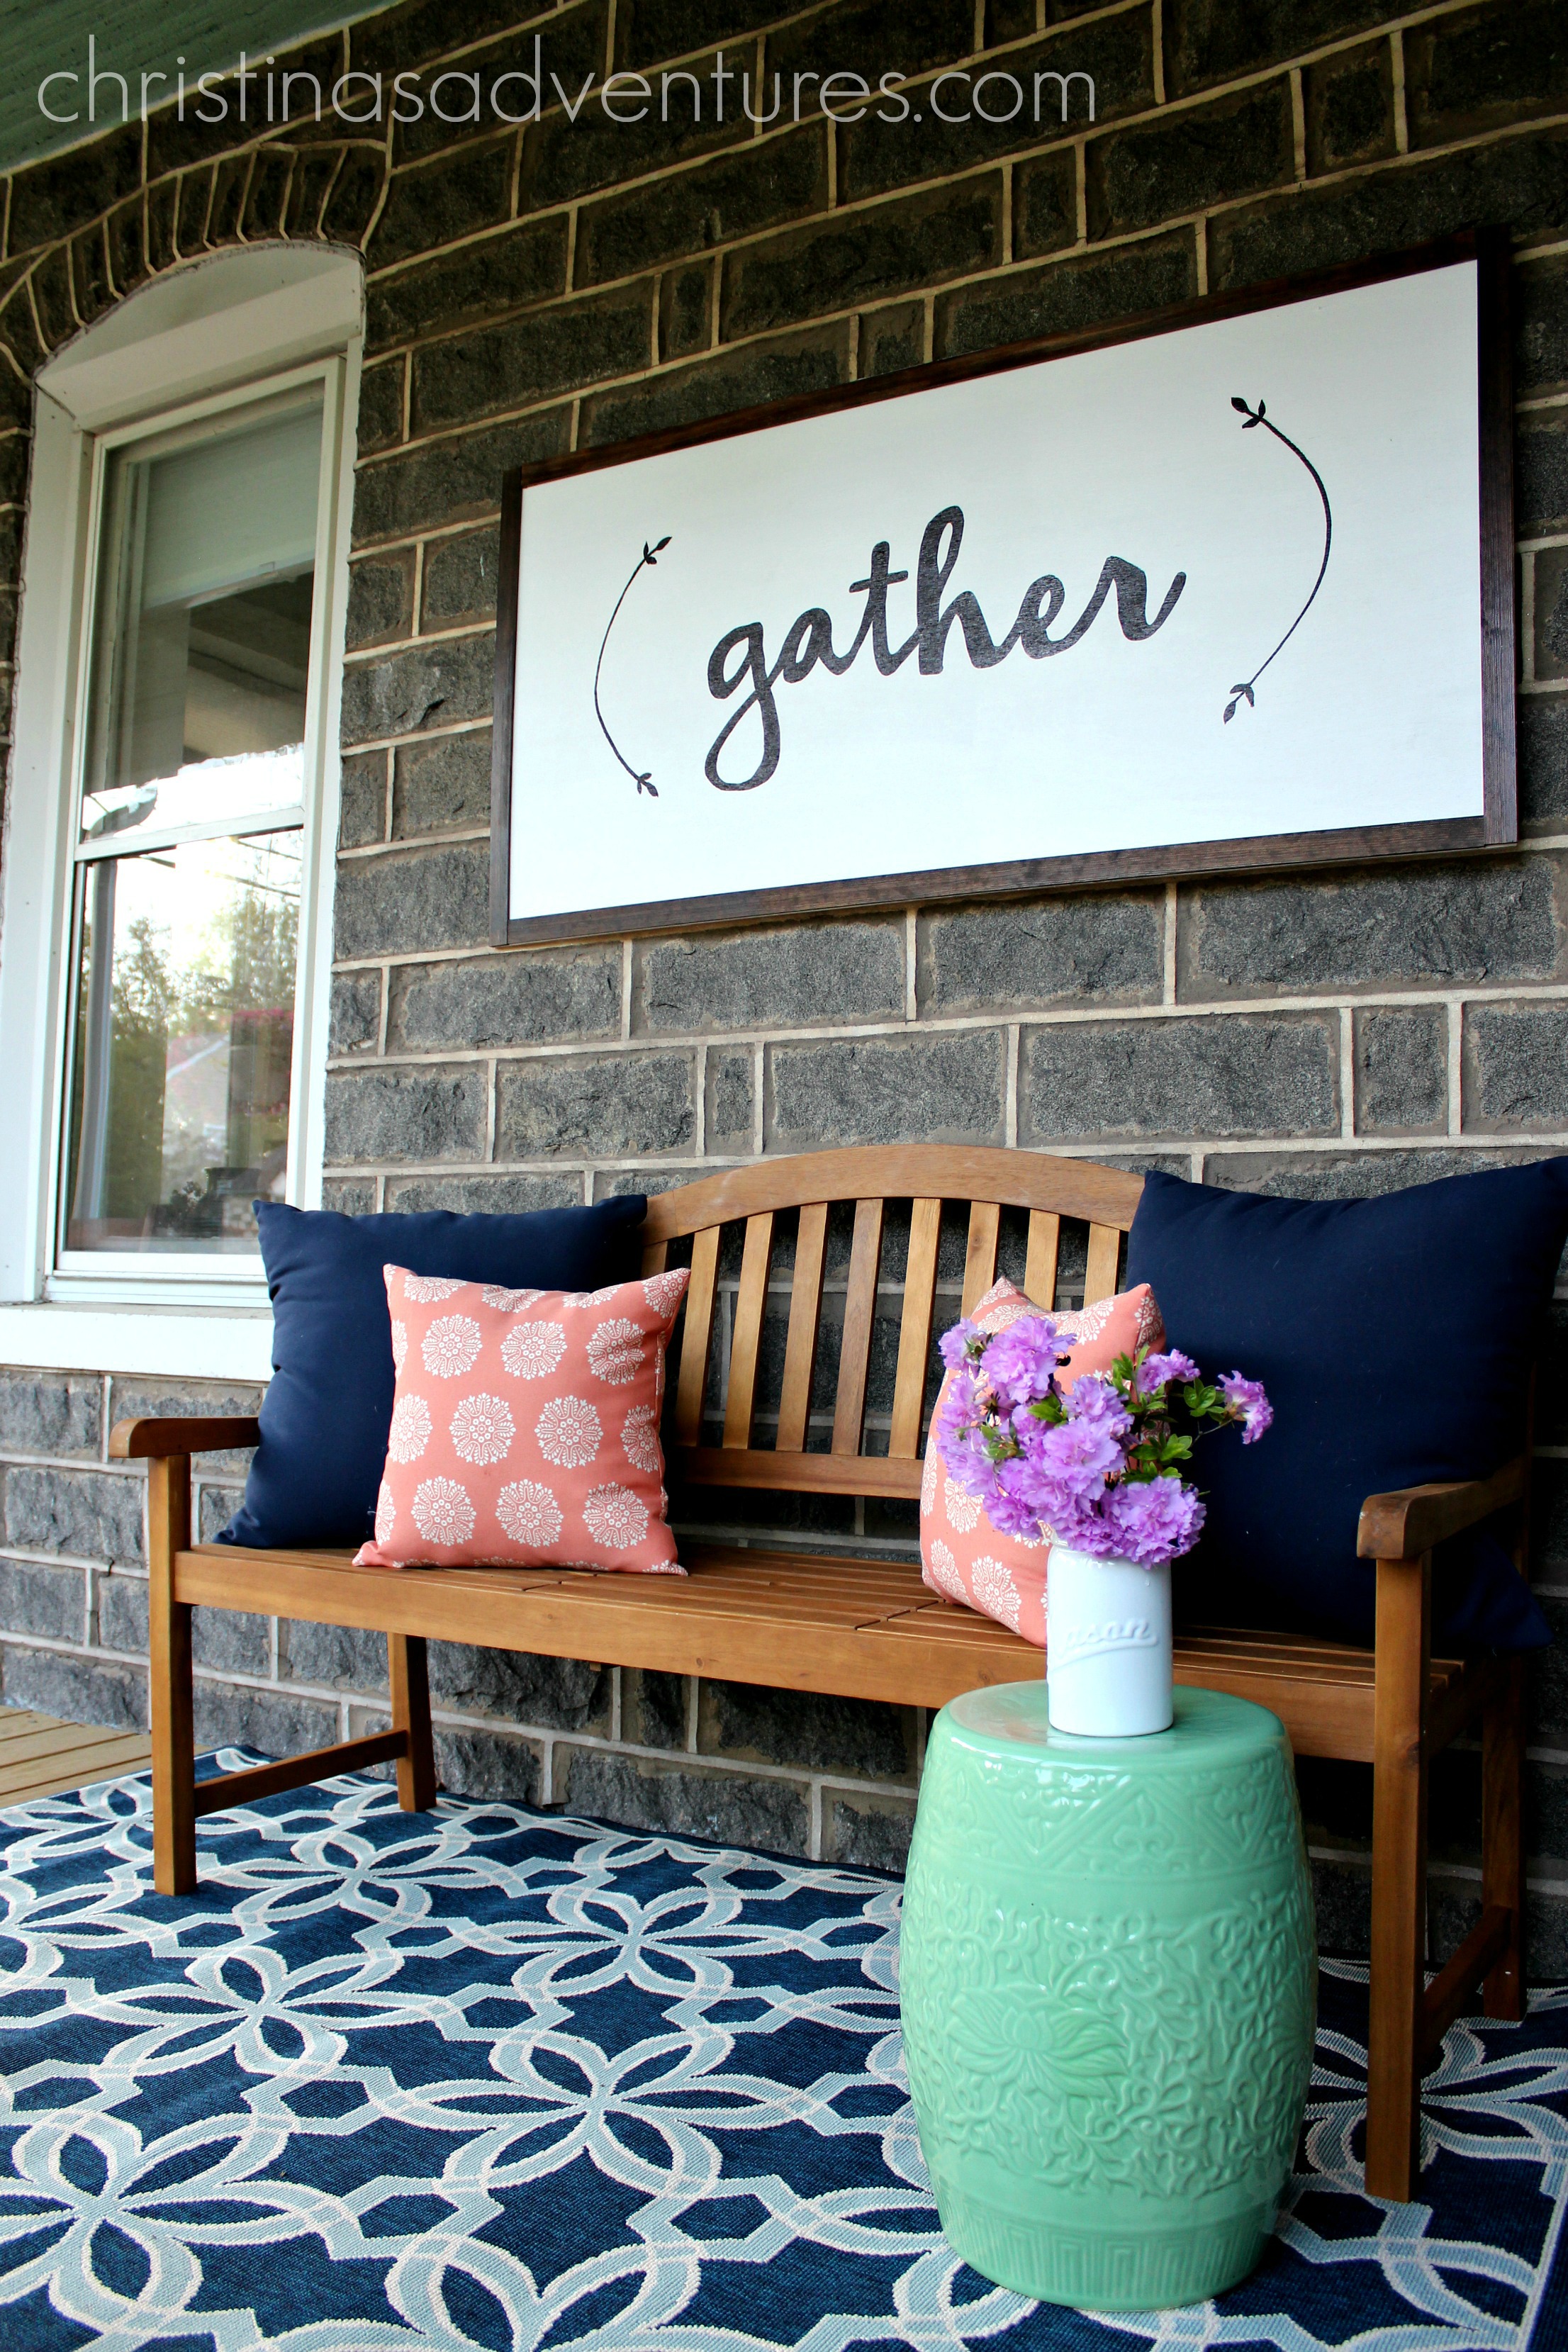
Making a show-stopping DIY large wood sign is easier to make than you think! Here’s a great tutorial for how you can make your own gather sign for your home.
I shared this “Gather” sign on our front porch on Instagram and I had so many people ask me to write up how I made it. Here’s a quick tutorial so you can make your own customizable gather wooden sign
How to make a large wood sign –
I shared this “Gather” sign on our front porch, and I had so many people ask me to write up how I made it. Here’s a quick tutorial so you can make your own customizable wooden sign
subscribe to my e-mail list at the bottom of this post to receive this printable wooden sign template for FREE!

Materials needed (this post contains affiliate links for your convenience. full disclosure here.)
- Plywood (use exterior grade plywood if hanging outside)
- Flat trim wood
- Primer
- Paint
- Stain(this is the kind I used for my border, but any of these stains are great!)
- Liquid Nails
- Sharpie paint pen (LOVE these and use them on so many different projects!)
I made a video of the process here – to see the pictures and instructions, keep scrolling down!
The back of this sign is made of plywood. I got mine cut at Lowe’s once I figured out the correct dimensions. Make sure that if you’re going to be using this sign outdoors (like I did) that you get an exterior plywood.
Paint the plywood your color of choice – I did a coat of primer & a coat of satin white paint. Then you’ll make the “frame”. It’s so simple – I stained flat trim wood (it’s $5 for an 8 ft. piece) and adhered it with liquid nails.
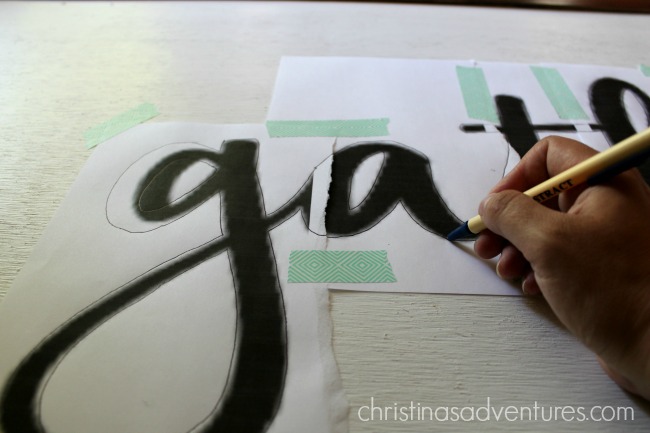
How to transfer text onto a wood sign –
Once the adhesive dries, figure out what word/phrase you want to write, and pick a font you love. I enlarged the word, and split it up in a Word document. I did one page per letter for this sign. Tape them in place on your painted plywood:

Trace the letters with a ballpoint pen. Make sure you press hard – you want to make an indent in the wood underneath the paper:
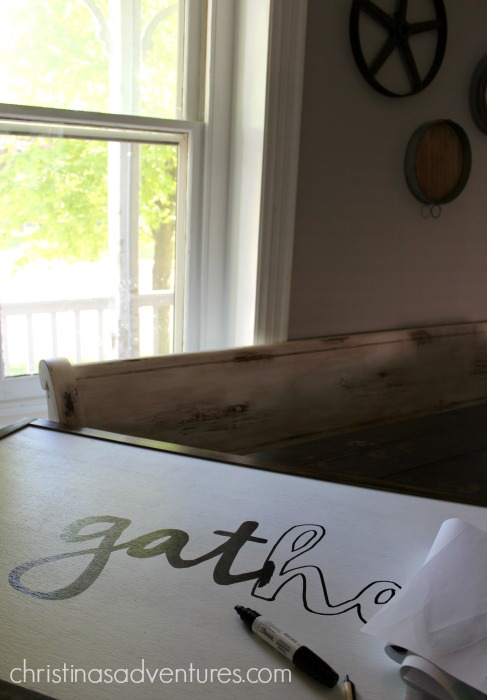
Finish up your gather sign –
Once you’ve traced your word, you’ll want to fill it in. You could choose to use paint and a small brush, but it makes it SO much easier if you use a paint pen.
And that’s it! We attached two large sawtooth clips on the back to hang on concrete nails:


See more pictures of our welcoming porch space here.
Now, if you don’t want to make your own sign – there’s no judgement here! There’s a LOT of options of gather signs you can buy online – here’s my favorite picks:

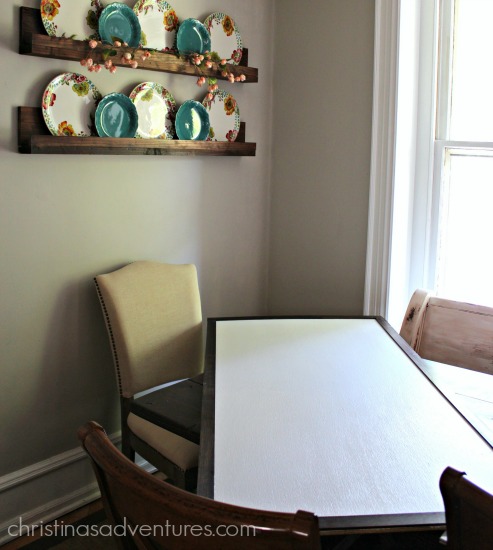
I made another version of this sign, using a similar technique, in our kitchen. Come see how I did it:

Like this large wood sign tutorial? Share with other and save for later by pinning on Pinterest here!

So cute! My SIL and BIL are moving into their first home soon and this would make an awesome house-warming present. Do you mind sharing the name of the font you used?
Thanks so much, Abby! That would be such a sweet gift 🙂 I’m so sorry – I don’t remember the font name 🙁 I got it from http://www.dafont.com/ though – they have so many good free fonts!
the font is called Hickory Jack 🙂
Thank you so much Nicole!! 🙂
would love to know the name of the “gather” font!!!
thank you
dee
It’s called “hickory jack” 🙂
I always wondered how people make these signs with such perfect writing! I am so tempted to make one now!
Evelina @ Fortunate House
Yes- secrets revealed!! Ha! You should absolutely make one 🙂
Do you have dimensions of the cut plywood and trim pieces?
So sorry – I know that the sign was 5 feet wide – but I don’t remember how high. I can measure when I’m home (and can run outside with my measuring tape) 🙂
I always thought I would never be able to make a sign like yours but you make it sound easy! I’m going to give it a try! Thanks!
This is my kind of DIY!
I can’t wait to make one for the porch!! Thank you so much for the “how to” especially the tip about using the paint pen!
Where did you find the flourishes for the beginning and end of the sign? It is gorgeous!!
Sorry Sandy – wish I could be more helpful, but I did them free-hand! 🙂
The word program on my Apple computer does not enlarge the letters enough. Any suggestions?
Hey Brenda – I’ll actually be providing the printable for this sign (as soon as I finish formatting it correctly) with my e-mail subscribers! If you subscribe, you’ll receive the link for that printable shortly! 🙂
I just subscribed for your emails. can you send me the printable for this sign….please?
Just came across this tutorial and it is EXACTLY what I’ve been wanting to create for my family room. Has a printable been created for this sign? If so, I’d love to find out how to obtain it 🙂 Thank you!
Nice site – glad I happened on to it.
My brother and s-i-l just rebuilt a cottage on a lake on property that has been in her family for several generations. The previous cottages were all named the same so I’d like to gift them with a sign with the same name to put over their front door. This sign would be out in the weather. Do you have any suggestions of recommendations as to weatherproof this? Thanks.
Patti H
That’s a great idea, Patti! I’d make sure you use an outdoor approved plywoood and exterior paint/stain. Then seal it with exterior polyurethane, and it SHOULD be good to go! 🙂
I love this! Unfortunately I haven’t been able to get the video to load. Can you explain a little more about how you adhered the frame? Did you adhere to the front of the plywood or the side? Thanks so much! I’m anxious to try it!!
sorry if it wasn’t clear, Susan! I adhered the trim to the front of the plywood 🙂 I’d love to see a picture if you make this sign!! 🙂
Love this!
How did you do the frame around it? I’ve made my sign, and now I’d love to know how you did your simple frame? thanks!
Yay! So glad yo hear you’ve made your sign! I used flat trim wood from my hardware store. I stained it before I adhered it to the front of the sign with liquid nails. Hope that helps!! 🙂
I appreciate this tutorial! Did you use a water or oil based paint pen? How do you hang a heavy sign likūe that?
Love the porch
I know the plywood is an exterior plywood, but was it a specific kind? The sign is beautiful!
Love your ideas
Love this sign and I would love to have the template. Thanks!
Love!!!
I just painted our dining room table with white chalk paint and the chairs are black and I distressed them all. This will go perfectly in that room. I just need to know how thick was your plywood? Thanks!
Like your site!
Would like to be on your mailing list please
This is so cute! I love it!!
Wonderful sign & tutorial. Can’t wait to fix one for our back porch!
Love this project!! Thanks so much for sharing!!!
Love this!!
Hi! Did you use the oil based sharpie paint marker? I’m going to pick up a pack of them, but they also offer water-based, so just double checking!
Thanks!
I used oil based 🙂
Thank you!! 🙂
Love it!
Thank you for sharing this!
thank you!
Hi There, I love your gather sign. I’m going to try to replicate this beauty!
Love hearing this – please send me a picture of it when you’re done!! Or tag it with #1902signs on social media! 🙂
Love this! Subscribing now, would love to receive the link.
Can’t wait to try to make some signs
Love this tutorial and can’t wait to start getting your emails.
Thank you for the tutorial and for sharing the template. This will not only save time & money, it will add the perfect touch to my dining room.
I love this!
Thanks for the idea and tutorial. I upcycled an old cabinet door that was in our Catholic Church’s original parish hall. For some reason my Dad had saved it over 30 years ago when the hall was torn down to build a new one. The door was in his barn and I spotted it last weekend and knew it would be perfect for the project. I cleaned off the dirt and painted chalkboard paint on the center of the door and used a chalk paint pen to write with. It will be the perfect addition to our kitchen décor just in time for Thanksgiving!
LOVE this post!
Genius! I just made a sign using this tutorial and it worked fantastic! Thanks so much!
Thank you. Love this tutorial
Thanks! I would love to make he gather sign. Sign me up for emails.
What font did you use for your gather sign? Did you only use Word or another program for the font?
I also would like to know that
Nice.
Thanks for sharing the printable
Thanks for the great project! Any tips on how to use the liquid nails without making a mess of it? I’m hesitant to use glue instead of real nails…
Apply in a thin strip and away from the visible seam (towards the letters) – it’ll be totally fine! 🙂
This is gorgeous! Wondering if you purchased a specific type of plywood?
Probably a silly question but did you paint the back as well?
Not a silly question – but I didn’t 🙂
I’m going to try this for our diningroom.Thanks!
I love this sign!!!! I would love to have the template! Thanks!
This is such a fabulous tutorial! I have a few empty walls in my house that need something pretty just like this! Thanks for sharing! 🙂
Love this sign
What did you do to finish the edges, if anything? If the trim is on the front, I’m trying to visualize what the edges look like. Thanks!!
Just stain the side of the plywood and it blends right in 🙂
I’ve been running around all day trying to get everything together to make this! I was wondering what type of plywood you used as in how thick was it!? Was it the thick heavy exterior one or the normal thin one? Thank you so much!
Sorry just getting to this! It was exterior plywood and I have no idea how thick it is 🙁 Sorry!!
Love love love this ,looks amazing
I just wanted to pop in and say that this tutorial brought me to your blog way back in 2016! This DIY piece has been a focal point in multiple spots around our home since then, and it is now making its debut on our updated front porch nearly 6 years later. This sign has been through two moves and a new marriage since then, and it is still such a sweet reminder of what makes life so grand – gathering with those we love. Such a subtle message, but one that I am reminded of every time I pass it.